Project Space: How to make Applique Keyrings
Shopping Bag
William Gee's Haberdashery

Welcome back to William Gee.
Please sign in or Register for a faster checkout.

William Gee's Haberdashery

Welcome back to William Gee.
Please sign in or Register for a faster checkout.

How to make applique keyrings

PROJECT SPACE: Appliqué Keyring

Made To Sew - Applique Keyring 21

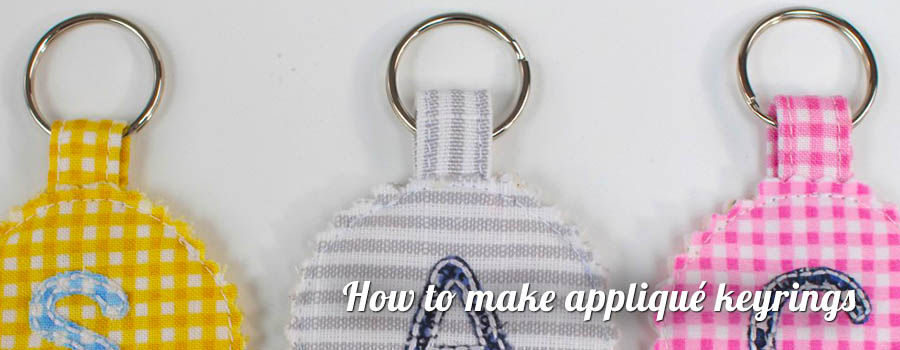
Learn how to make one of these fun keyrings. Join us for our appliqué keyring tutorial and learn new machine and hand sewing techniques whilst whizzing up a professional looking keyring in 15 minutes (a tad longer with appliqué) – leaving you enough time to take orders from friends and family!  Personalise your keyring with appliqué and decorative hand-stitching… whatever takes your fancy!

Materials:
– Fabric
Interfacing
– Embroidery Thread (for appliqué)
Wadding (we used 100% cotton wadding)
– Metal Ring
Thread
– Template (download from website: Click Here)
Equipment:
– Sewing Machine
Scissors
Pinking Shears (optional)
Pins
Needle
Removable Pen, Chalk, Pencil
Ruler, Tape Measure
Start by choosing the fabric you wish to work with. We used a cotton fabric, however many fabrics will do; cotton, poly cotton, lightweight upholstery, linen etc. We recommend interfacing your fabric, we used a medium weight iron on interfacing (lightweight fabrics may require a heavier interfacing). Iron this onto the WRONG side of your fabric.
If you wish to work with our circle template you are welcome to download the pattern from our website: Click Here. Alternatively draw a circle that measures 2? (5cm) in diameter; or work with your own shape/size. We recommend drawing your template onto paper or card for ease.
Made To Sew - Applique Keyring 1
Cut out 2 squares of fabric that are approximately 3? (7.5cm) square. They MUST be larger than your chosen template size. Interface the fabric on the WRONG side.
Start by competing your appliqué design, this is an optional step. Complete this on the RIGHT side of one piece of fabric in the centre of the square.
Made To Sew - Applique Keyring 2
Made To Sew - Applique Keyring 3
You will also need to cut out a smaller square for the tab that joins the keyring onto the metal ring. This square should measure 2? x 2? (5cm x 5cm). We did not interface our tab however if you are working with a lightweight fabric this may be required.
Position the tab with the WRONG side facing up. Fold two opposite edges to meet in the middle. Press in position.
Made To Sew - Applique Keyring 4
Fold the tab in half again. The tab should now measure 2? (5cm) by 1/2? (1.25cm). Press in position and pin in place ready to sew.
Made To Sew - Applique Keyring 5
Made To Sew - Applique Keyring 6
Sew 1/8? (3mm) away on the long edge of the tab. Firstly sew the open pinned edge of the tab and then along the opposite side. Use a standard straight stitch and back-stitch to secure the stitching at the start and end of the row.
Sewing a such a small piece of fabric can be difficult. Try turning the hand wheel on the sewing machine to walk a few stitches to get started, a walking foot can help with this. If you struggle to complete a back-stitch at the start and end of the sewing, simply tie off the threads with a knot.
Made To Sew - Applique Keyring 7
Trim threads. Fold the tab in half with the preferred side facing OUT. Position the metal ring in-between the two layers of fabric so that it sits at the folded edge.
Made To Sew - Applique Keyring 8
Sew along the raw fabric edge about 1/8? (3mm) away from the edge, to hold the layers together. This does not have to look pretty. Back-stitch if possible to secure the stitching.
Made To Sew - Applique Keyring 9
Now it’s time to start work on the keyring fob. Position the template onto the RIGHT side of the fabric (with appliqué design). If you have completed an appliqué design you will want to check that this is in the centre of the template.
TIP: To make this easier why not copy your template onto tracing paper so that you can see through the design and check the placement of your design is central or as you desire.
Draw around the template using a removable pen or chalk.
Made To Sew - Applique Keyring 10
Made To Sew - Applique Keyring 11
You should have 2 layers of interfaced fabric and some wadding. We chose a lightweight 100% cotton wadding, however feel free to mix it up! Thicker wadding will give a stiffer, thicker and more structured finish. Why not test different layers of wadding and interfacing on your fabric first?
Made To Sew - Applique Keyring 12
Lay the bottom layer of fabric with the WRONG side facing up (this should be the interfaced side). Position the wadding onto the bottom layer. Cut the wadding to the same size for ease.
Lay the top layer of fabric (with appliqué) onto the wadding with the RIGHT side facing up. This will create the sandwich we are going to sew.
You will also need to add the metal ring and tab. This should sit at the top of the keyring in-between the FRONT layer and wadding. You want to have approximately 1/4? (5mm) of the tab sitting into the drawn template circle. You should be able to feel the edge of the tab below the drawn line.
This can be slightly confusing, if you need extra instructions check out Aneka’s YouTube Video!
Made To Sew - Applique Keyring 13
Made To Sew - Applique Keyring 14
Pin all of the layers together securely, especially the tab.
Made To Sew - Applique Keyring 15
Sew around the drawn line on the sewing machine. Rather than completing a back-stitch at the start and end of sewing, try sewing around the circle and simply sewing over the stitching by approximately 2-3 stitches as you return to the start. This will create a neater result as lots of back-stitching can appear messy.
Be sure to hold the tab in place whilst sewing, so that it stays straight on the keyring. Try using a walking foot to improve the ease of sewing over this area, otherwise walk the stitches forward using the hand wheel.
Made To Sew - Applique Keyring 16
Trim threads and knot at the back of the keyring (if required). Remove the pen or chalk marks if possible.
Made To Sew - Applique Keyring 17
Use pinking shears (or normal scissors if your fabric doesn’t fray) to cut around the sewn line.
If your working with pinking shears try and keep the zigzags consistent by lining up the previous zigzags with the serrations on the scissors. Try and position the point of the zigzag on the scissors about 1/16? (2mm) away from the stitching line, be consistent! Work carefully, you do not want to cut through the stitching.
When you reach the tab at the top of the keyring you will need to cut through the front layer of fabric separately to the back layer and wadding. Do NOT cut through the tab.
Should you be working with normal scissors, trim the excess fabric 1/8? (3mm) away from the stitching line.
Made To Sew - Applique Keyring 18
Congratulations you have made a beautiful appliqué keyring, perfect to make as gifts for friends and family! Get your designer hat on and try out different appliqué and embroidery details.
Made To Sew - Applique Keyring 19

We’re thrilled to announce that we’ve partnered with Tree Nation, the platform to reforest the world & fight climate change! Home to over 90 planting projects in 33 countries, Tree Nation is a non-profit organisation that helps people & companies offset their CO2 emissions. Join us by planting trees & offsetting carbon emissions with William Gee today!

[]